Residential roofers specialize in the installation, repair and maintenance of residential roofs. They work on a variety of roofing materials including asphalt shingles, tile, slate and metal.
Homeowners have the option of choosing various roofing materials depending on their budget, climate and aesthetic preferences. Asphalt shingles are the most popular choice due to their affordability and durability. Visit https://www.jmelitecontractors.com to learn more.
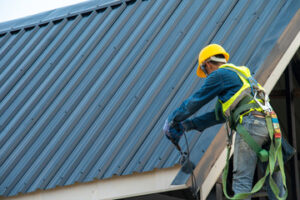
Residential roofers install, replace, and repair roofs for homes and other buildings. They also perform regular inspections to spot problems and address them before they become serious issues. Professionals have the skills, tools, and equipment to do their work quickly and efficiently. They also know how to handle hazardous materials, such as asbestos. This is important because roofing jobs can be dangerous, especially for untrained homeowners who may not follow safety practices.
Licensed residential roofers have the experience and skills to repair any type of roof. They can inspect a roof and recommend the best repairs, such as replacing worn or missing shingles. They can also install new shingles and flashing to ensure the roof is watertight. In addition, they can help homeowners choose the right roofing material for their home, such as tile or slate.
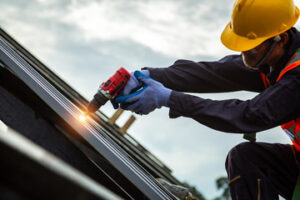
Some types of roofs require specialized skills and materials to install or repair. For example, flat roofs need different construction methods than sloped ones. Some roofers specialize in working with flat or low-sloped roofing systems, while others are experts in the installation of shingled or clay tile roofs. Some roofers also have specialized skills in repairing and installing metal roofs, which are common in commercial buildings.
Homeowners can save money by hiring licensed and experienced residential roofers instead of doing the job themselves. These professionals can also help them file insurance claims if they are damaged by storms or other factors. In addition, licensed roofers can provide a warranty on their work and offer better warranties than non-licensed contractors.
A good roof is essential for a safe and healthy home. If your roof is not properly installed or repaired, it can leak and cause damage to the structure of the house and contents. Leaking roofs can also lead to mold and rot. Professionals have the knowledge and skills to install or repair a variety of roofs, including sloped, flat, and shingled roofs.
Roofers must have good communication and customer service skills to interact with customers. They must be able to answer questions and explain the roofing process in detail. They also need to be able to collaborate with other construction professionals, such as carpenters and electrical workers.
Licensing
Residential roofers must have a license in order to work in the field. They must pass a trade exam, submit proof of insurance and a surety bond, and demonstrate their knowledge of building codes and laws. They must also meet education and experience requirements, such as completing an apprenticeship or working as an assistant to an experienced roofer. The path to licensure is lengthy and requires commitment to the industry.
In addition to passing a state licensing exam, a residential roofer must have general liability and workers’ compensation insurance. They may also need to have a special certification for certain projects, such as asbestos removal. The specific certification required will vary from state to state, but is usually offered by a private third party or government agency.
Licensed roofers are often preferred by home owners because of their experience and expertise. They can help homeowners make informed decisions about the best roofing materials and styles for their homes. They can also explain how the different roofing materials differ in terms of cost, maintenance, and lifespan. A residential roofer can also help homeowners with the permitting process and other legal requirements.
While residential and commercial roofers share some of the same basic skills, they have completely different skill sets. A residential roofer will be more familiar with the construction of single-family homes and multi-unit housing complexes. They will also be better equipped to deal with localized leaks, which can be caused by a small number of damaged or faulty shingles or other components.
Although some states do not require a roofer’s license, they must be registered at the city level to perform their work. Unlicensed contractors can do substandard work, and they may face legal issues if they are found guilty of malpractice or fraud. Using a real-time license verification tool will help you determine whether your pro has the right credentials. The tool will give you the contact information of your state’s regulatory body and link you to their website where you can verify their qualifications. You wouldn’t trust a cab driver without a license, so why would you trust someone to work on your roof?
Insurance
When a homeowner hires a roofing contractor to work on their home, they want to be sure that the roofer is insured and licensed. If a homeowner suspects that a roofer may not have this insurance, they can check with their city to verify that they do, and they should also ask any subcontractors the roofing company will be using to work at the home for proof of their own insurance.
The main type of insurance a residential roofing contractor needs is general liability, which covers accidents that occur during the course of business operations. This type of insurance can cover medical expenses, property damage, and other related costs. Many homeowners prefer to work with contractors who have this insurance, as it protects them from having to pay out of pocket for any incidents that might occur during a project.
In addition to general liability, a roofing contractor should also have workers’ compensation insurance. This type of insurance will pay for an employee’s medical bills if they are injured at work, and it can help them to make ends meet while they are out of work. This is why many homeowners will ask a roofer to show them proof of workers’ comp before they agree to work with the company.
Roofers should also have commercial auto insurance, which covers vehicles that are used for business purposes. This type of insurance can be essential if a roofer has employees who drive to and from work or deliver materials to jobsites. Commercial auto insurance can also include coverage for a fleet of vehicles.
Lastly, a roofer should have equipment breakdown insurance, which can pay for repairs or replacements for tools and other machinery that are damaged in a covered event, such as a fire or flood. Some insurers offer a policy called a tool and equipment floater, which provides additional protection for specialized equipment like ladders, air compressors, or premium shingles.
Other types of insurance that a roofer may need can include commercial property insurance, which will provide coverage for office buildings, storage facilities, and garages. This type of insurance can also cover contents inside of those buildings, including valuable information and equipment. A roofer may also need a surety bond, which is a type of specialized insurance that can help with licensing and contractual obligations.
Reputation
A good residential roofer will be able to provide you with references from previous customers. You should also check their online reputation and social media pages for reviews and testimonials. These will help you decide whether the company is worth hiring for your roofing needs.
Be wary of high-pressure sales tactics. Trustworthy roofers will give you time to make a decision and will not pressure you into signing a letter of intent or paying a large deposit upfront. Also, avoid “storm chasers” that canvas neighborhoods following severe weather events. These scam artists often exploit homeowners’ desperation by offering quick repairs with minimal inspection and then disappearing.
You should also check the roofer’s team members’ qualifications. Experienced and stable employees are a sign of a reputable roofing company that will be around for years to come. They will also be able to answer your questions and address any concerns that you may have.
A reputable roofing company will provide you with a detailed contract that lists the scope of work, materials to be used, job timeline and terms of payment. It should also include any warranties or guarantees that the company offers.
A quality residential roofer will offer regular updates on the status of your project, either via email or over the phone. They will also ensure that any mess is cleaned up before leaving your property. In addition, they should be available to address any issues or concerns that you might have during the project. In this way, you will be able to stay on top of your roofing project and get the results that you are expecting.