A gas leak poses serious health and safety risks. Even a minor leak can cause devastating fires and damage to property.
The first sign of a potential leak is a hissing sound near appliances or the gas line. You should also look for physical symptoms, like dizziness, nausea and breathlessness. Explore more about gas leak repair in the sections below.
The first thing you should do if you suspect a gas leak is to evacuate the premises and get in contact with your local utility company as soon as possible. They’ll probably shut off the gas supply at the street-side valve so that there’s no further leakage.
Once you’re out of the building, it’s essential that all of your family members and workers leave as well. You should also stay away from any electrical equipment, power points and light switches. These can generate sparks that can ignite the leaking gas, creating a potentially deadly explosion.
If you’re confident that the location of the leak is clear and it hasn’t been leaking for long, you may choose to turn off the gas valve in question. You’ll usually find this valve in a utility area, such as the basement or garage, and it can be turned off by twisting the lever a quarter of the way until it is perpendicular to the supply pipe. However, this should be a last resort, and only used if you are certain of the exact location of the leak.
It’s important to note that turning off the gas supply is not a permanent fix, and that you will need to have it switched back on by your utility provider after they’ve inspected the leak and determined that it is safe to use again. This can take a long time, so it’s best to evacuate the premises until this process is complete.
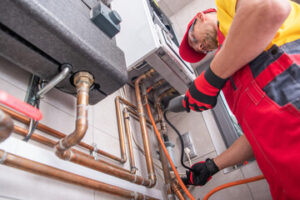
It’s worth noting that you should never try to locate or repair a gas leak on your own. This is a job that requires professional help from qualified plumbers and gas line installers who have the experience and tools to safely do so. There are also many reasons why you should hire a professional, such as the fact that they can offer a warranty on their work and will ensure all of your appliances are running correctly after the repair is completed. You’ll also find that a professional can provide you with valuable information about how to avoid future issues, such as by installing gas line sensors and regular servicing.
Remove the Insulated Covers
The first step to take before you start a gas leak repair is to remove the insulated covers from the gas line. This is one of the most important safety precautions you can take because working on a gas pipe with the cover still in place could cause an explosion. It also makes it more difficult to find the source of a leak because you can’t see inside the pipes.
If you have a gas leak, you should turn off your gas supply as soon as possible and get everyone out of the house—including pets. A small gas leak can lead to carbon monoxide poisoning, which is not only dangerous but can also be fatal. Carbon monoxide is odorless, colorless, and tasteless, making it difficult to detect without a carbon monoxide detector installed in your home.
Gas lines are made of a variety of materials, depending on when your house was built and what type of appliances you have installed. However, the most common material for gas lines is copper, and it’s not uncommon for this type of pipe to develop a leak. This can happen due to aging, poor installation, or if an appliance is moved suddenly.
In some cases, the leak is caused by corrosion under insulation (CUI). CUI occurs when acidic water penetrates the insulating materials on the outside surface of a pipeline. This can be due to a wide range of factors, including weather conditions like rain storms and extreme temperatures, which can accelerate the corrosive process. The corrosion under insulation will eventually eat through the surface of the pipe, which can result in leaks.
To spot a gas leak, you should listen for hissing or whistling noises near the gas line or check for any physical symptoms. You can also use a handheld gas leak detection device or apply soapy water to the surface of the pipes to look for bubbles.
It’s important to have professional services repair a gas leak as quickly as possible to prevent serious damage and health risks. It’s also a good idea to have your home regularly inspected and to have a carbon monoxide detector installed, which will help to prevent these dangerous issues from occurring in the first place.
Repair the Pipes
Your home has a maze of pipes that run throughout the walls and under the floors, bringing natural gas to your appliances. These pipes can become disconnected or corroded, leading to a gas leak. A gas leak can be very dangerous, so it’s important to leave gas line repair to the professionals. A gas leak can cause a fire, explosion, or carbon monoxide poisoning. If a gas leak isn’t fixed quickly, it can also lead to flooding and property damage.
Major leaks can be detected because of the odorant added to natural gas, but minor leaks are often hard to notice. Some symptoms of a gas leak include: Foul sulfur or “rotten egg” smells. Hissing noises from an appliance or connection point. Experiencing nausea, dizziness, confusion, or fatigue. Loss of appetite. Pets losing their appetite or acting lethargic. Excessive energy use or higher utility bills. A licensed plumber will have the tools and training to safely repair your leaky gas lines. They will also be familiar with state and local rules and codes, so they won’t commit any violations.
Before a plumber begins any work, they’ll likely need to file a permit with the NYC DOB and get a gas test from the city’s water department. The cost of a permit and the water test will be included in the overall price of the repair, as well as any labor required to access the pipes and complete the repairs.
If you can’t afford to have a professional inspect and fix your gas leaks, there are some DIY tests you can perform to see if the problem is caused by a broken pipe or another issue. A simple test with dish soap and a rag can reveal the location of a leak by causing bubbles to appear at the spot where the leak is occurring.
Once the leaks are repaired, the gas supply can be turned back on. However, before reinstalling the covers, it’s best to test again to ensure there are no more leaks. If the test proves successful, the covers can be reinstalled.
Test the Pipes
Gas leaks can be dangerous, even when they are small. Besides increasing your energy bills, they can also create fire hazards or even cause death if you inhale too much of it for too long. Fortunately, you can prevent this from happening to you by performing regular inspections and repairs of your gas lines.
The first thing to do is to get rid of any protective covers from your pipelines. This is essential to identifying and fixing any gas leaks. While doing this, it’s important to wear a mask to avoid inhaling any gas fumes. You should also turn off any appliances in your home that are connected to the gas line. Once you’ve done that, open all the windows and doors in your home to vent out any excess gas.
Next, you’ll need to find the source of any gas leaks. This can be difficult since most of the time, the pipes are underground or in other areas that aren’t easily accessible. One way to do this is by using a gas detector, which will alert you of any leaks via a specialized alarm or app. Another way is to use a solution of water and dishwashing liquid to test the pipes. The chemical in the soap will react with any gas that is present, causing bubbles to form around it. This will make it easier to spot a leak in your gas pipework.
Lastly, you can also try listening for any hissing or whistling sounds near the gas lines. Listen carefully while you walk around your house, especially in the areas closest to the pipes. If you hear any strange sounds, it’s best to shut off any noise-making devices and leave the area immediately.
Once you’ve identified the location of a leak, it’s time to perform gas line repairs. Start by detaching the low-pressure gas line from the regulator. Then, crack the line fittings with a wrench to relieve any residual pressure and then clean them using acetone. Once the pipes are cleaned and sealed, reattach them but do it loosely to avoid creating new pressure points that could lead to future leaks.