Cabinet Refinishing San Jose CA offers a cost-friendly facelift for your kitchen. This involves sanding down the existing surfaces, repairing imperfections and then applying new stain or paint.
But refinishing won’t address structural problems or more serious wear and tear. For lasting improvements, consider refacing instead.
Cabinet refinishing is a cost-friendly update option for homeowners looking to refresh their kitchens. However, this type of cabinet renovation may not be the best choice for all scenarios.
The first step is to thoroughly clean your cabinets with a mild detergent and water. This helps to ensure the surface is pristine and ready for repair and painting. Using harsh cleaning products or abrasive cloths can scratch the wood, which leaves it susceptible to chipping.
Next, if you are repainting over existing paint, it is important to determine whether the current finish is oil-based or latex-based. This will help ensure that the new paint adheres properly to the cabinet surface. To test for this, simply dip a cloth or cotton ball in rubbing alcohol and rub it on an inconspicuous area of the cabinet. If the paint comes off, it is most likely oil-based.
After the cabinet surface is completely dry, it is time to start the actual refinishing process. Using a high-quality primer is the key to getting a smooth and long-lasting finish. Primer also helps the paint adhere better to the cabinet, which can help prevent future chipping.
Once the primer has dried, it is important to sand any areas where repairs have been made. Depending on the severity of the damage, this might be as simple as running a piece of fine-grit sandpaper over the surface. It is always a good idea to sand with the grain of the wood, as this will help to ensure that any repaired areas blend seamlessly with the surrounding surface.
The next step in the refinishing process is to apply a coat of stain or clear polyurethane. This will help protect the cabinets from everyday use and keep them looking their best. Once this has dried, it is time to start applying the paint. Generally, it is recommended to apply two coats of paint for the best results. It is recommended to wait at least an hour between each coat.
After the final coat of paint has dried, it is a good idea to reattach any hardware and to wipe down the cabinets with a damp cloth to make sure they are dry and free from dust and debris. It is also a good idea to let the paint cure for a few weeks before using your cabinets.
Repairing
If you’re on a tight budget and want a simple aesthetic update, refinishing may be the right choice for your cabinetry. This process involves sanding down the existing cabinet doors and frames, repairing minor damage, and then applying new stain or paint. It works well for cabinetry made from solid wood and engineered wood products, as well as laminate and medium-density fiberboard (MDF).
Before painting your cabinets, we’ll do a thorough inspection of the entire surface to make sure it is free of any cracks or splits that might interfere with the quality and longevity of the finished product. We’ll also clean the surfaces to ensure the best bonding and prevent dirt from seeping into the newly-sanded areas. Finally, we’ll apply a high-quality primer with fine grit sanding in between coats to prepare the surface for your chosen finish.
If necessary, Hilgenberg will fill any imperfections with Bondo, a versatile auto body filler that can be used on a wide range of materials and is particularly good at filling in gouges or scratches. Once the Bondo has dried, we’ll sand the repaired areas smooth again, and then prime them with shellac-based primer before sanding again. Depending on the condition of your cabinetry, this process can take up to two weeks.
Once the primer has dried, Hilgenberg will sand the surface again with fine-grit sandpaper to prepare it for your chosen finish. We then apply multiple coats of premium, professional-grade paint to achieve a flawless, like-new factory finish. We’ll also sand again between each coat to ensure a perfectly smooth surface before adding the next.
Both refacing and refinishing are great ways to give your cabinetry an instant refresh. However, refacing is considered the more environmentally friendly option since it minimizes waste by reusing your existing cabinet boxes and only replacing the cabinet doors and drawer fronts. Additionally, refacing saves on energy costs and doesn’t require cutting down any additional wood resources. Both options offer the opportunity to change the overall look of your cabinetry, and both will add value to your home.
Sanding
A cabinet refinishing job requires more work than a simple color change. The cabinets must be stripped and sanded down to the bare wood before primer and paint can be applied. To minimize damage, sanding should be done very slowly and with caution. Over-sanding may cause the wood to become damaged and leave gouges or scratches in the surface of the cabinet door.
The first step in sanding is to use a medium grit to remove any rough spots and old finish from the cabinet surface. It’s important to sand in the direction of the grain so that you don’t create holes or pits in the wood. After sanding, you can apply a wood filler to patch any dents or scratches that you find on the cabinet doors. It’s important to follow the directions on the back of the wood filler you choose. Many of them require 24 hours to dry before moving on to the next step.
Once the wood filler has dried, you can begin the sanding process again. Again, it’s best to start with a medium grit and work your way up to a fine grit to achieve a smooth, even surface that is ready for priming and painting.
It’s also a good idea to sand the edges of the cabinet doors and any other intricate details. This will ensure that the new paint won’t crack around these areas. For this, you can use a hand-held sanding sponge or sandpaper wrapped around a block to get into tight corners and detailed edges.
After you’ve sanded the cabinets, you can wipe them down with a damp cloth to remove any lingering dust and debris. If you want, you can sand again after priming to smooth away any ridges and drips in the surface of the cabinet.
While cabinet refinishing can be an excellent option for some homeowners, it may not be the best choice for everyone. It’s not a good fit for historic preservation or vintage cabinets, and it’s not as effective at changing a room’s look and feel as refacing.
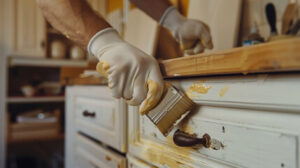
Painting
If your cabinets are stained and in good condition, painting them may give you the look you want for your kitchen without the cost of new cabinets. The first thing to do is remove all of the hardware, such as cabinet pulls and knobs, and place it in a safe spot where you can find it when you are ready to reinstall them.
Next, clean the cabinets with a degreaser to cut through any kitchen grime that has built up over time. If there are any areas that need wood filler or other patching, do it now to prevent future chipping or cracks. Once the patching is done, sand the surfaces again and wipe down with a damp cloth to remove any dust and residue.
You will need to prime the cabinets before you begin painting, especially in a high-traffic area like the kitchen. A quality primer, such as KILZ 3, provides the best adhesion to help prevent paint chipping and is mildew resistant for a long-lasting finish. Let the primer dry according to its label directions.
Once the primer is completely dry, you can start painting. Use a foam roller for large flat surfaces and a soft-bristled brush to get into corners and tight spots. Practice on a piece of scrap wood or an old door to get a feel for your application and how much pressure you need to apply to avoid streaking.
Allow the paint to dry for a day or two before you reinstall your cabinets. Be sure to follow the paint manufacturer’s instructions in terms of drying times, as some paints can take up to 24 hours to fully cure.
The main difference between refacing and refinishing is that refacing replaces the doors, hinges, and handles while refinishing only repaints the existing cabinets. Refacing is a more extensive project than simply painting your existing cabinets and will increase the overall cost of your kitchen renovation. It is important to decide which option works best for your home and budget. For a more dramatic change, you could also consider replacing your existing doors with brand new cabinets.