Roofing installation can be tricky work and requires a lot of hard work and skill. The process involves a few different steps.
The contractor will lay an ice and water barrier, if needed, then run underlayment over it. The underlayment will be fastened down with cap nails, close together near the edge and spread out farther towards the middle.
Installing a new roof is messy and dusty work. Experienced roofing contractors will do their best to minimize the impact of this work on your home, but there is no way to eliminate the mess entirely. That’s why it is a good idea to take steps to protect your belongings during the installation process. For instance, wall-hung pictures and delicate mementos should be moved to a safe spot inside the house, as vibrations from hammers and nail guns can cause items to fall and break. Large patio furniture or grills should also be relocated to a safer location to avoid damage from falling debris.
Before the actual shingling begins, it is important to have a clear line of communication with your roofing contractor about what is expected. Whether it is determining the best time to start work or how waste will be handled, keeping communication open will help prevent any surprises down the road.
Once the roof is prepped, a layer of underlayment and felt paper is installed to protect your home’s structure. This is especially important for areas where water tends to collect, such as in valleys, gable ends and ridge vents. Waterproofing these areas will ensure your home is protected from water intrusion in the future.
Finally, the shingles are installed. An extra row of shingles, known as starter shingles, are placed along the edge of your roof. This adds strength and protection to the area where wind often blows shingles off the roof. Next, the main shingle rows are placed, beginning at the eaves and overlapping each other. A special attention is given to the peaks of the roof where specialized shingles are used to ensure maximum protection.
Other elements of the roof are secured with flashing, which is a sheet of metal that covers seams and prevents rain from seeping into your home’s interior. This is particularly important around chimneys, vents and other spigots where water could enter your home through cracks in the structure. The final step is to cap the ridge and rake ridges with specialized shingles, which provide added protection from wind-driven shingle loss.
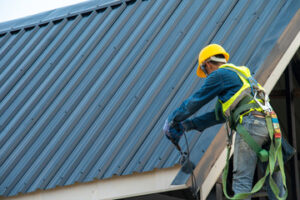
Installation
If you’re not confident enough to climb onto your roof or don’t have the right gear, it’s a good idea to hire a professional. He’ll take multiple steps to protect your property before the work begins. This may include covering sensitive areas of your garden, driveway, and air conditioning unit with tarps or using wooden boards to shield them from falling debris. He’ll also have a dumpster delivered and set it up on the property to dispose of old materials as the job progresses.
Then he’ll start installing your new shingles. He’ll overlap the first row by six inches and nail them close to each other at the edges. Nails will be further apart in the middle of the row. He’ll continue this pattern until he reaches the roof’s ridge.
Your contractor will also install flashing around chimneys, wood stove pipes, vents, and other items as well as ice and water sheathing in the valleys. He’ll use roofing cement to seal these and in certain other leak-prone areas. He’ll also apply caulking around the exposed raw edges of the underlayment.
Finishing Touches
Once the roof material is in place, additional details are added to ensure that the finished product is watertight. This includes cutting additional vent holes for skylights and pipes, installing a layer of underlayment around them, and caulking to ensure that the water-resistant barrier remains intact.
This also involves precise overlapping of each new course of shingles to guard against leaks and to contribute to the aesthetics of the final result. Attention to detail is critical at this point, and experienced roofers will follow manufacturer guidelines and industry best practices. Finally, ridge caps and trim are installed and the job site is cleaned up.
Warranty
When it comes to protecting your investment, warranties are an important tool. They help provide homeowners with peace of mind knowing that they can contact their roofing contractor if something goes wrong with their roof. But, what many people don’t know is that not all warranties are created equal. In fact, it’s extremely important to understand the difference between two types of roof warranties: contractor and manufacturer warranties.
A manufacturer warranty centers around the quality of the materials that are used to construct a home’s roof. This type of warranty typically covers material issues such as a shingle that cracks, fades or becomes discolored. However, it is important to note that these types of warranties do not cover installation errors or leaks.
In order to qualify for a manufacturer’s warranty, it’s often required that the homeowner hire only approved contractors to install the product. This is because the warranty is only valid if the manufacturer’s specifications are followed precisely.
For homeowners looking for more protection than a standard manufacturer’s warranty, some manufacturers offer extended warranties. These are usually offered for a longer period of time, such as 50 years, and can cover both the materials and the installation. However, they still exclude the easy-to-replace auxiliary material such as metal edging, flashing and adhesives.
Workmanship warranties, on the other hand, are provided by roofing contractors and cover issues related to the workmanship of a new roof. Whether or not a roofing company offers this type of warranty is an indicator of their ability to stand behind the quality of their work and their overall reliability.